Tuesday, August 23, 2016

Singapore (Yum)memories...

One of the delights of Singapore food is the Curry Puff. Vendors of this street snack can be found at various locations around SG.
Recently saw a method of recreating them on John Torode's Malaysian Adventures programme. 
They are really easy to make and scored a 10/10 from the resident expert!!!!

Chicken Curry Puff

Ingredients for the filling

    150g cooked chicken or turkey meat, shredded
    75g diced potato, cooked
    50g frozen peas
    150g thick curry sauce - Rendang Curry Paste is recommended

Ingredients for the puffs

    500g ready-made puff pastry (I used 2x 320g ready rolled sheet packs)
    1 medium free range egg, beaten with 1/2 tsp salt
    Plain flour for dusting
 

Method

Filling

1. Mix the shredded chicken or turkey and the potato together and add the peas. Add the sauce and mix well to combine.

1. Preheat the oven to 200C/400F/Gas Mark 6

2. On a lightly floured work top, roll out the pastry into a large rectangle (skip that bit if using ready rolled sheets!) and cut out rounds of the size of a scone using a glass or use a 3" round pastry cutter (I used a 4" bowl to cut the rounds). You should get about 20 rounds, 4 across and 5 down - (I got 6 rounds per 320g sheet and a couple more from the offcuts).

3. Brush round the edge of the half of each rounds with the beaten egg mix - like adding a eggy "smile" to each round.

4. Spoon tablespoonful of the mix into the middle of each round and fold the pastry over to get a crescent shape. Gently press the sides to seal. (You may seal the sides by crimping with a fork).

5. Repeat with all the pastry and lay onto a lined baking sheet - only cook 6 at a time to maintain the oven temperature to produce a crisp crust.
6. Place them into the oven and bake for 20 minutes or until golden brown.

7. Serve them hot or they can be frozen.


Tuesday, June 21, 2016

Quick hop across the border into Holland...

...for some Dutch Frikandel. I often had one from my local Schnell Imbiss but unlike the German Frikadellen which is like a thick burger, the Frikandel is a 'skinless' sausage and often served on its own with curry ketchup and mayonnaise and topped with chopped raw onion, the Frikandel Speciaal.

Using a the recipe from this site I thought I'd give this one a try...


End result was pretty good - the recipe made 10 8" long Frikandel.

Not possessing a Millecroquette to make the frikandels, once the mix had been well combined I lined a baking tray with greaseproof paper then spooned the mixture into it. After flattening it all out I divided it into strips of 11/4" wide and 8" long (across the shortest side of the tray).


Roll into sausage shape using some greaseproof paper

Then cooked per instructions in the bouillon

Set to one side before deep frying for a few minutes.


The end result - Frikandel Speciaal


If I have one 'criticism' it is that the method above doesn't produce the dense texture that I remember.

This is the Millecroquette which some sites suggest using to make the frikandel -
https://www.amazon.co.uk/Millecroquettes.../dp/B004X8SDS6

Thursday, June 2, 2016

Another foray into German cuisine - Koenigsberger Klopse...

During an episode of the spy drama "Deutschland 83", a plate of what looked like meatballs in white sauce was served to a senior East Germany Secret Service officer by Martin Rauch's mother. A little research revealed the meal as Koenigsberger Klopse.
This dish was also featured in a recent Rick Stein Long Weekends episode.

Had a go at making it this afternoon...

Served with mashed potato and pickled beetroot


Recipe used -
Koenigsberger Klopse / (Konigsberg Meatballs):

For the meatballs:

    1 hard bread roll or bun (a Kaiser roll or something similar is perfect)
    3/4 cup water
    1 lb ground beef (as lean as possible)
    1 strip of bacon, diced
    4 anchovy fillets, diced
    1 small onion, chopped
    1 large egg
    1/2 teaspoon salt
    1/4 teaspoon white pepper (or black if you prefer a stronger flavour)

For the broth:

    3 pints chicken stock
    1/2 teaspoon salt
    1 bay leaf
    1 small onion, peeled and halved
    6 peppercorns

For the gravy:

    1 1/2 tablespoons butter or margarine
    1 1/2 tablespoons unbleached flour
    1 tablespoon capers
    Juice of half a medium-sized lemon
    1/2 teaspoon prepared mustard (brown is best)
    1 large egg yolk
    1/4 teaspoon salt
    1/4 teaspoon white pepper

First, make the meatballs. Soak the roll in the water for about 10 minutes. Squeeze it dry; place in a mixing bowl with the ground beef. Add the bacon, anchovy fillets, onion, egg, salt and pepper, and mix them all together thoroughly.

Next prepare the broth. Boil the water, and add the salt, bay leaf, onion, and peppercorns to season. While this is going on, shape the meat mixture into balls about 2 inches in diameter. Add to the boiling broth and simmer over low heat for 20 minutes.

Remove the meatballs with a slotted spoon, set aside, and keep warm while you make the gravy.

Heat the butter or margarine in a heavy frying pan, and stir in the flour. Cook for 3 minutes, stirring constantly. Slowly blend in 2 cups of reserved broth.

When the broth is all stirred in, add the drained capers, lemon juice, and mustard. Simmer for 5 minutes.

Remove a small amount of the sauce to blend with the egg yolk. Stir the egg yolk back into the sauce, making sure it's thoroughly blended in. Season with salt and pepper.

Put the meatballs into the gravy: reheat it if necessary. Serve on a preheated platter.

A warm vinaigrette-based potato salad goes very well with these.

Saturday, April 9, 2016

Back to the Lab :: Cold Brew Tew...

Revisiting the cold brew method and trying a slightly different approach this time. The last batch had me filtering several times to achieve the clarity that I wanted, so have gone with the coarsest grind and making little 'coffee bags' to steep in the cold water.
One method I'd found on line uses the 'basket' style paper filters to make the bags which are tied at the top. Had to resort to ordering these from Amazon but they arrived today (only ordered them yesterday!!!) so have ground, bound and drowned for the last hour!!!

Used a small ramekin to help with the tying up part - each bag has about 3 large scoops in each. Total of six bags containing just under 8oz of coffee.


As a way of cold brewing coffee this is so far the easiest/cleanest/hasslelessest I've tried.
Saves spending $50 on something like this -
https://www.oxo.com/cold-brew-coffee-maker 
The basket filters cost £6 for 100, so I'm ahead, I think!...


End result is good - not 'crystal' clear but totally acceptable bearing in mind it was poured straight from the jug once the bags had been removed.

 
Tying the bags


Ready for the 'pot'

Six bags in total.

Ten or so minutes later and 'tint' to water.

About 18 hours later

No additional filtering - straight from the jug.

Saturday, January 2, 2016

Erbse und Kartoffel Wurstsuppe

Had an opened pack of Bockwurst in the fridge that needed using up, so threw together a sausage and pea soup.

Really tasty and warming...

1 red onion finely chopped
2 medium potatoes diced
800g pack frozen peas
1 litre vegetable stock (2 cubes)
3 large Bockwurst cut into half inch thick slices (de-skin prior to slicing if preferred)
tbsp olive oil
knob of butter
pepper

Heat oil and butter in large saucepan.
Add onions and cook gently until transparent.
Mix in potatoes and cook for 5 minutes.
Season with pepper.
Add stock and stir then add the frozen peas.
Bring to a simmer and add the Bockwurst slices.
Continue to heat gently until wurst is heated through.
At this point, you can either turn off the heat and leave to have later (is tastier allowed to stand for a couple of hours) or if eating straight away, ladle out about 700ml of the pea/potato/stock mix into a suitable container (I used a 1ltr jug) and using a wand blender, blend the mix to produce a smooth soup. Return this to the remaining soup and stir in. Continue to heat gently (if allowed to cool previously) then serve.


Saturday, October 3, 2015

Bara Brith recipe


This is my version of the Welsh Bara Brith (Speckled Bread) that my mum used to make.

Ingredients:
1 lb self raising flour
1 teaspoon baking powder
pinch of salt
1 teaspoon of mixed spice
4 oz margarine
5 oz soft brown sugar
1 egg (beaten)
12 oz mixed dry fruit
1 desertspoon each of syrup and black treacle
3 tea bags
300ml boiling water
Milk if needed.

Method:
Add 3 tea bags to 300ml freshly boiled water and allow to steep for about five minutes.
Remove tea bags.
Place dried fruit into a jug or similar container and add the hot tea mix - add the sugar and stir well.
Add the syrup and black treacle to the warm fruit/tea mix and stir well to dissolve.
Leave mix overnight for fruit to absorb liquid ( I left it for almost 24 hours to ensure the dried fruit really 'plumps' up!)
Next day, sift flour into bowl and add mixed spices, salt and baking powder and stir ingredients.
Rub in the margerine until you achieve a crumbly mixture.
Add the beaten egg and fruit/tea mixture and stir well. 
Add a splash of milk if the mix is on the dry side (if you leave fruit to absorb liquid for a long time then the milk may be needed to moisten the cake mix).
Pour mixture into a cake tin measuring approx 9.5"x4.5"x3"
Bake in oven at gas mark 4 for 1-1.5 hours. 
Cover with a sheet of foil if top is starting to burn.
Check with a cake tester to ensure it is baked through.

Leave to cool (overnight is best!).
Serve sliced and with lashings of butter (Welsh, if you can get it)!!!! 
Try and make it last more than a couple of days!!!

Mwynhau!

Wednesday, September 9, 2015

A grinding matter...

Having appreciated the presence of the Aeropress on a two week self catering holiday recently, I wondered if there was any portable grinder that could compliment the Aeropress.
A little research pointed me to the Porlex Mini Grinder, a Japanese burr grinder (burr is good!).
It arrived today and while the instructions are completely in Japanese, a quick online search found a couple of sites that provide a translation of the instructions.
The device is easy to use and an initial grind of some beans produced a even quality of ground coffee. Filling the lower part with 17g of beans (the amount recommended by some users for the Aeropress) turns out to be enough to fill the upper chamber to the lip. So, easy to measure, should you forget your pocket scales!
The Mini version is just the right size to fit into the outer part of the Aeropress to help with packing.


Tuesday, September 8, 2015

The Lab :: Cold brew coffee

Step 1.
Coarsely grind 1/2lb coffee beans.
Place in suitable container (Kilner Jars seem popular) - I opted for a fridge door sized "Lock&Lock" drink 'jug' to keep the space taken up by this 'lab test' to a minimum!
Slowly add 2.5 to 3 pints cold water and gently stir the mix. (This is using a 1 to 5 coffee to water ratio as suggested on some blogs).
One last stir to ensure a good mix the secure lid and leave for 12-24 hours.


Step 2.
Stay tuned... 

6/10/15: Well, the coffee kept well for the last 3 weeks. It's now finished and have to say it was pretty good to the last drop. No bitterness at all and handy for making a quick cup of decent tasting coffee. Just add hot water/milk to the cold coffee 'shot' and off you go.
I have another 1/2lb bag of coffee to grind so a second batch is just around the corner.
 

Monday, September 7, 2015

After Coffee Jelly we have Bubble Tea!

Having recently being alerted to the location of a Bubble Tea store in town, a visit was made to taste this Taiwanese style of tea drink.
On the left is Matcha green tea with jasmine flavouring and tapioca 'bubbles' and one on right is vanilla, black tea and lychee 'ooballs'


Quite refreshing and it seems to appeal to the kid in me to be sucking up globs of jelly like tapioca through a extra wide straw!
Turns out there is another bubble tea store a matter of yards from this one! Chatime.

Monday, July 6, 2015

Only taken six years...


...for this to hit our shores. Back in July 2009 I was in Singapore and discovered what is a far east drink fad - a coffee jelly frapaccino. First had one in a Starbucks over looking Marina Bay a short walk from the hotel.

Singapore :: July 2009


Actually made my own version when I returned to the UK but missed not being able to order one here when the weather got hot. I don't think they even have this in the US.
Now Starbucks in the UK has brought it over - they are calling it a Caramel Coffee Jelly topped with cream, but you can order it sans the caramel and cream.


UK :: July 2015


Saturday, May 9, 2015

Peynirli Revisited...

I was kindly given some Pastourma to try, and decided to use some for another attempt at a Peynirli. Pastourma is a air cured meat similar in appearance to pastrami but is covered in a paste of crushed cumin, fenugreek, garlic and spicy paprika.
LINK


While I stuck with a pizza based dough this time, I will try to follow the recipe from HERE which looks to produce a softer, more bread like, 'boat' and seems closer to the photo sent by our 'reporter' in Greece...

Friday, April 10, 2015

Scottish Morning Rolls

Among the many items of Scottish fare* that I 'hold dear', is the humble Scottish Morning Roll. A good Morning Roll has a light and fluffy interior with a soft but slightly crisp crust. Makes the perfect bacon butty or Lorne sausage bap.

*Scotch Pie, Haggis, Lorne Sausage, Red Pudding, Clapshot, a good single Malt...

I can buy them in some of the supermarkets around here but the quality varies, even between batches, so I can end up with just a white roll.

As my other bread making attempts have worked well (and the pizza dough is a regular success) I thought I would turn my hand to attempting these fluffy white rolls.

Having searched for many recipes online I plumped for this ONE as it seemed to tick all the 'boxes' description wise.

Dough duly made and after an hour to prove then divided into 10 rolls I left them for a further 45mins to rise before baking.


The end result was quite close to the type of roll I was after, certainly light and fluffy. Taste wise they have a faint hint of a Brioche roll (probably due to the inclusion of the egg and sugar) so I will be doing a second batch excluding the egg, vegetable oil and sugar to see how they compare.
Overall though, I am pleased with the result.

Rolls update:
Trying a variation on the above I reduced the sugar to about 3/4 tablespoonful and they were less Brioche like - also only made six large rolls...


Thursday, March 26, 2015

Hasselback potato

 
Hasselback potato with chicken breast cooked in a ginger, chilli and lime marinade.


This style of baked/roasted potato apparently originated in a restaurant in Stockholm. They involve slicing into the potato to create slits, but making sure not to cut right through the potato. I use a pair of chopsticks either side of the potato to prevent slicing all the way through. Take a slice of the 'bottom' of the spud to ensure you don't cut all the way through (and leave the slice in the baking tray to have a crispy treat when cooked!) 
A sprinkling of parmesan and breadcrumbs halfway through cooking gives them a crispy topping.

I used the recipe here

Served with chicken breast cooked in a ginger, chilli and lime marinade.

Monday, January 26, 2015

I Don't Go "Wow" Often...

...but just had my first cup of coffee made in the Aerobie Aeropress.
I'd read a fair bit about this simple plastic french press/plunger coffee maker. Could it really be that good? I was getting a bit frustrated with cup after cup of varying degrees of bitter tasting coffee, no matter what I did.
So I bit the bullet bean and ordered one.
It arrived this morning and after washing the device, I ground some beans and a quick boil of the kettle, pour, stir, press and what followed was one of those "hmmmmmmmmm" moments!

No dregs (I mean zero bits), crystal clear coffee, nuances in the bean I'd not tasted before.

I believe the hype....


Think I'll be taking my stove-top pots and other brewing impedimenta to the charity shop!!!


UPDATE: 12.30pm: Just had a second mug and can confirm the first was not a fluke. Tried using the 'upside down' method this time, as suggested by some owners, and the grounds probably have a bit more of a steep this way. Still a quick and easy way to make a nice cup of coffee. 

Saturday, December 6, 2014

Mexican Cheese & Bean Lasagne


Mexican Cheese & Bean Lasagne

1 tbsp garlic oil
1 onion, peeled and chopped
1 red pepper, de-seeded and chopped
2 green bird's-eye chillies, chopped  with seeds
1 tsp sea salt flakes or 1/2 tsp pouring salt
2 tbsp coriander stalks, chopped  very finely
2 x 400g cans chopped  tomatoes, plus 400ml water swilled from empty cans
1 tbsp tomato tomato ketchup

  For the filling:

2 x 400g cans black beans, drained and rinsed
Fajita seasoning mix to taste
2 x 250g cans (225g drained weight each) sweetcorn
250g mature goat's Cheddar, grated , or cheese of your choice
8 soft tortillas

Preheat the oven to 200°C / gas mark 6, slipping in a baking tray at the same time.

To make the sauce, heat the oil in a pan on the stove and fry the onion, pepper and chilli. Add the salt and cook gently for 15 minutes and, once soft, add the chopped  coriander stalks.

Add the canned tomatoes, then swill the cans out with water and add this too. Spoon in the ketchup and let things come to a simmer, leaving the sauce (or salsa, in keeping with the Mexican mojo) to cook while you get on with preparing the filling - about ten minutes.

To make the filling, mix the drained beans and sweetcorn in a bowl add fajita seasoning mix to taste.  Add most of the grated  cheese, reserving some to sprinkle on the top at the end, and mix together.

Start to assemble the lasagne by spooning about a third of the salsa into the bottom of your ovenproof dish and smearing it about, then layer on two tortillas so that they cover the sauce overlapping slightly, like a Venn diagram.

Add a third of the beans and cheese mixture, covering the tortillas, and then about a quarter of the remaining salsa and another two tortillas.

Repeat with another third of beans and cheese, and some more salsa before layering on another two tortillas. Finally, add the last layer of beans and cheese, nearly all of the remaining salsa and cover with the last two tortillas. Spread the very last bit of salsa over the tortillas and sprinkle with the remaining cheese.

Bake in the oven for 30 minutes, and let it rest for a good 10-15 minutes before slicing like a pizza, and eat with some avocado salsa.


Based on a Nigella Lawson recipe with tweaks by Rosemary P

Thursday, August 28, 2014

There be Dragon Fruit...


I'm partial to Dragon Fruit when I can find it in the shops here - I developed a taste for this strange fruit while visiting Singapore. This is the purple variety - a white fleshed one can also be bought. I was advised by a local who served us in Singapore that you eat it sprinkled with salt. I did try that option when we got back to the hotel and have to say it does seem to enhance the flavour. No stranger than putting sugar on tomatoes I suppose?...
I've also tried the fruit dried and sliced and available in some food stores in the US. A healthy snack!

Friday, June 27, 2014

Anzac v2...


Took another stab at making these. The first couple of batches turned out fine but were more a soft, chewy flapjack than the crunchy biscuits I'm more familiar with.
As my research had turned up the suggestion that cooking them for longer, at a lower temperature, produced a crisper biscuit, this was the next stage. I'd also read a suggestion that forming the biscuit mix into small balls (about the size of a walnut) and placing them on the baking tray, rather than making flatter round shapes, produced a better end result.

So, using the same recipe below, I lowered the oven temperature to Gas Mark 2 (~150ºc) and increased the cooking time to 20 minutes.

These tweaks have done the trick - more crunch, slightly thicker, and more to my liking.

10/10

Saturday, June 14, 2014

ANZAC biscuits...


One of the few things I tend to buy in bulk, when I find them on the shelves of stores, are Unibic Anzac biscuits. For obvious reasons, they only appear around about the latter quarter of the year, so I stock up when I find them.

I love the taste of these biscuits and the crunch too. Frustrated at the restricted supply, I set out to try and make my own. 
The result from using the Anzac biscuit recipe on the BBC Good Food website was good, but they turned out as a chewy bicscuit, more akin to a flapjack than the hard crunchy biscuit produced by Unibic.

I have found another recipe, which uses a lower oven temperature and longer baking time - once the current stock in the biscuit tin has been depleted, which won't be long, I will be experimenting with Anzac v2...


Monday, April 21, 2014

"White" pizza with seafood


Following a short discussion with a friend, I attempted to cook a variation of the recipe for a White Pizza with Clams as featured on the eatingwell.com recipe website.
This was the first time that I had used the double baked method of producing a pizza base. I used a variation of ingredients to the eatingwell recipe, on one side tuna and anchovies and capers and on the other side I used tuna, squid pieces and smoked mussels with some mushrooms.
Cooking the pizza base for 8 to 10 minutes initially, with no topping, produced a nice crisp base onto which the olive oil and garlic mixture was poured and spread. The toppings were then added and the pizza was returned to the oven for a further 8 to 10 minutes.

Thanks to Jeremy H for the suggestion.


Sunday, April 13, 2014

New gin in the cabinet...


Added a new gin to the list - Caorunn Scottish Gin. 

Caorunn gin
"Caorunn is more than a gin. It is a perfectly balanced, super-premium small batch Scottish Gin, Infused with hand-picked botanicals, inspired by Celtic tradition.

Created from the Celtic landscape, Caorunn Gin delivers a taste that sets us apart.
Caorunn Gin is uniquely served with a freshly cut red apple to enhance its invigorating, clean and crisp taste.
    One part rowan berry
    One part heather
    One part bog myrtle
    One part dandelion
    One part coul blush apple..."

Saturday, March 15, 2014

Okonomiyaki - "Japanese pizza"

Okonomiyaki (お好み焼き) literally means “grilled as you like it” in Japanese. I saw this being made on a UK food show featuring The Hairy Bikers during a visit to Japan.
Looked like my kind of food so had a go at making it.
I used the recipe from norecipes.com and while it lacked many of the more exotic ingredients such as the katsuobushi or nagaimo I think it turned out reasonably well.
With no Japanese mayo I just used Hellmans and I had read that okonomiyaki sauce is very similar to Worcestershire sauce so just used that in its place.


Wednesday, January 8, 2014

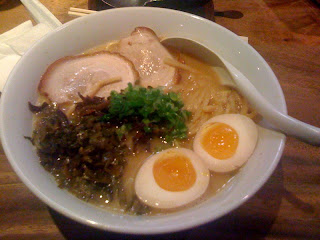
Monta Japanese Noodle House - Las Vegas


So good we went back twice!!!!

Monta Ramen - What is MONTA's TONKOTSU Ramen?

Monta Ramen serves "KURUME" style Tonkotsu Ramen - broth made from selected pork bones and the unique soy sauce imported from Japan.

The origin of KURUME-style ramen is Fukuoka in Kyushu region - served with thick and rich pork based broth with thin, unrisen noodles. Kurume ramen is considered the original Tonkotsu ramen and had great impact on ramen culture throughout Japan. 


Sunday, December 8, 2013

Spiced Chicken Parcel - like a giant curry puff!

Drawing inspiration from Indian curry, Chinese (Dim Sum) and Greek ("Crispy Chicken Greek-style pie" - dopita stodiani?) cuisines, Nigel Slater set about creating a hybrid of a meal.
His "Spiced Chicken Parcel" uses elements from all three recipes to produce a tasty and filling meal which is fairly quick and easy to make. He used chicken thighs as the dark meat tends to be a bit more flavoursome.
I had to use frozen Filo pastry and as there were six sheets in the pack, I added one extra layer to the parcel.

This might also work well with turkey meat, as a boxing day solution to all the leftover turkey!


Spicy chicken and rice are bundled together in in a lovely crisp parcel of buttery filo pastry in this easy, yet unusual, chicken supper.
Ingredients:
4 chicken thighs, skin and bones removed
4 tbsp olive oil
1 tsp cayenne pepper
1 tbsp ground turmeric
1 tbsp garam masala
200g/7oz basmati rice
400ml/14fl oz chicken stock
75g/2½oz butter
freshly ground black pepper
5 filo pastry sheets

Preparation method
Preheat the oven to 200C/400F/Gas 6.
Remove the skin and bones from the chicken thighs and roughly chop.
Warm the olive oil in a large pan. Add the chicken and spices and cook on a low heat for three minutes, taking care that the spices do not burn.
Add the rice and the stock to the same pan. Bring to the boil, then reduce the heat to a simmer. Replace the pan lid and allow to cook for 10 minutes.
Melt the butter and season generously with pepper.
Lay a sheet of filo pastry on a large baking tray and brush generously with the peppery butter. Lay a second, third and fourth sheet of filo, brushing each one with more butter as you go.
When the 10 minutes of rice cooking has elapsed, evenly spread the chicken and rice mixture on one half of the filo rectangle.
Brush around the edges of the mixture with more butter and then fold the empty filo side over the mixture like a book and press down the edges.
Take the remaining filo sheet, soak it in the butter, crumple and place on top of the parcel as decoration.
Bake in the oven for 30 minutes.

Sunday, November 10, 2013

Grünkohl mit Mettwurst.

Always on the look out for new food ideas I spotted what looked like a warming winter meal which originates in Northern Germany and was served up to Rick Stein at Schinken Toni's in Düsseldorf.
And it's German!

Grünkohl mit Mettwurst (Curly Kale with sausage)


I ordered some coarse German sausage (Mettenden) amongst the Bratwurst, Currywurst and Bockwurst from German Deli London to use in a suitable dish. The Grünkohl seemed like an ideal recipe to use it in.

I stretched the meal out over two evenings - first night it was served up with boiled new potatoes and next night I fried the left over potatoes to follow the recipe below a bit more closely. It worked better with the fried potatoes in my opinion.
I didn't use the smoked pork chops as recommended in the recipe below, as it was pretty 'meat heavy' but just used some lardons to get the smoked bacon flavour.
All washed down with a glass or two of Bitburger...

This is a translated recipe which I have edited to try and make it easier to follow...

2 servings

500g kale
2 inch thick slices of bacon (replace with medium pack of smoked bacon lardons)
2 Mettwurst
2 Kassler smoked pork chops (optional)
1 medium onion
200-230g small potatoes - unpeeled
1 tbsp mustard - medium hot
200ml vegetable stock
to fry some butter
1 to 1.5 tablespoons of oatmeal to bind (optional)
salt, pepper and nutmeg for seasoning

Dice the onion very finely.
Melt about 1 tbsp butter in a large skillet or a roasting pan and fry the onion to golden yellow.
Then add the bacon and fry on medium heat on both sides and then add the kale and cook for a few minutes.
Season with pepper and nutmeg and a little salt (the salted bacon and cured Kassler already contain salt as does the veg stock, so be economical adding more) and finally stir in the mustard.
Then pour about half of the vegetable stock to the pan and then leave it on low heat with the lid closed to simmer for about 45 minutes.
Stir occasionally and pour in a little more vegetable stock if the kale dries out.
After three quarters of an hour, arrange the pork sausage around the pan and let it simmer for another 30 minutes closed.
While the sausage cooks cook the potatoes in slightly salted water.

OPTIONAL - After half an hour add the smoked pork chops
and leave with the lid closed for about 20 minutes, turn once shortly after 10 minutes.

In the meantime, we can divide our potatoes, then melt some butter in another pan
and fry them on both sides vigorously to which we season with a little salt.

If there is too much fluid in the kale we just remove the meat from the pan and stir about a tablespoon (possibly more) oatmeal to absorb the liquid and let it boil for a few minutes.
If necessary add more salt, pepper and nutmeg, then return the meat back to the pan so it does not cool.
Each serving consists of smoked pork chop, a piece of bacon and a sausage along with a good spoonful of kale and some sauteed baby potatoes on the plate.

The pleasantly spicy kale proved to be a real treat. In combination with the delicate, lean smoked pork, the spicy bacon and coarse, well-cooked sausage as well as solid, partially crispy fried potatoes an absolutely delicious and above all very satisfying lunch or dinner dish.